| 21:
Vertical Seams
Knitted garments are generally knitted from hem
to neck, and the sleeves start at the cuff and finish at, or near,
the shoulder. Some are worked from shoulder to hem. The side and
sleeve seams are worked at the edges of knitting, so they are
vertical seams.
Usually, knitters pin the finished pieces together and, with the
wrong side facing, work a backstitch seam. If that is what you
intend to do with your next garment, then I’ll say goodbye now, but
if you would like to work a seam that matches rows so that the
fabric of the garment falls and hangs perfectly, is almost invisible
and looks professional, read on.
---
Stocking stitch: knit side facing
The least visible (and therefore desirable)
seam is worked with the right side facing,
matching row to row. The
yarn used for the seam joins the connecting threads that are in a
vertical line between the first and second stitch from the edge on
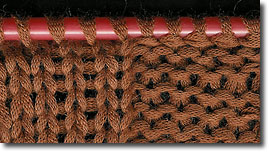
each side. These connecting threads look like the rungs of a ladder
[pic 1].

1: The connecting threads between the first and second
stitches from the edge of a piece of stocking stitch knitting are
like the rungs of a ladder. These are the threads you will be
joining to make the seam.
Thread the needle with the long piece of
yarn attached to the knitting when casting on or casting off, or
another length of yarn if you haven’t left long ends to use. With
the right side facing, hold the two pieces side by side, one above
the other. If starting from the cast-on row, place the needle
through the edge stitch on one side, then the same stitch on the
other side. Make a tiny, tight stitch to keep the seam together. On
the top piece, find the horizontal thread between the first and
second stitch, catch under this thread with the needle, pull the
yarn upwards through to the front of the work, then catch the
corresponding horizontal thread on the bottom piece, and pull the
yarn through to the front [pic 2,3].
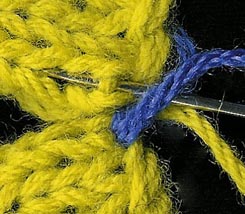
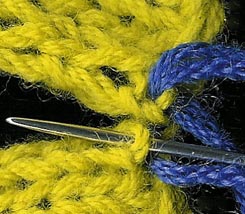
2: (left) The first joining stitch on top piece.
3: (right) Second joining stitch on lower piece.
Continue joining these threads in sequence,
from side to side, occasionally pulling the yarn to firm the seam
[pic 4].

4: Continue joining the threads
alternating from side to side.
NEXT PAGE >>
chapter page: 1 | 2 |
3 | 4 |
5 | 6 |