9:
Counting
I have already mentioned that you should count the number of
rows when working the bands, (see
here) but that is only the tip
of the iceberg.
You should count rows and stitches until the last stitch of the last
row has been knitted. Use a pad or pencil, or jot the numbers on
your pattern.
The number of rows to be joined to each other must match if the
garment is to hang and fit properly, however simple or elaborate the
finished garment. This goes for cuffs, body, sleeves, neck, skirt,
everything.
Many patterns state the number of stitches to be cast on and how to
knit them, and then directions to work a certain length, either
inches or centimetres. If this is the case, work to that point on
the first piece and count and note the number of rows. Then you will
know the number of rows you must work on the corresponding piece or
pieces. The number of rows between hem and armhole must match. The
number of rows from armhole to shoulder must match, or the sleeves
won’t fit in properly. The number of rows in a sleeve should match
or one sleeve will be longer than the other.
If you don’t count, you could easily measure or pull the knitting
differently every time you finish a section. It is very tempting to
stretch the knitting just a little bit to finish that boring sleeve
and get it over and done with, but extra rows on one piece can’t
hide. They are extra length. One sleeve will be down to your
knuckles and the other will sit at your wrist.
Extra rows on the back of a garment will mean that it will hang down
at the back. That’s good if you have intentionally shaped it to do
that, but it is a problem if it is just from having too many rows.
The reverse will mean that the front will be long and the garment
will ride up at the back.
Joining mismatched pieces together is easy if you just pin them and
work a backstitch seam from one point to another. The seam is
cobbled together, but the extra rows don’t disappear. They show up
in wear, sagging or hanging in the wrong places and also are obvious
as buckled seams.
If you don’t count rows and are working in stripes or a pattern
sequence, you could find that you will finish sections at different
places.
Counting the number of stitches is also vital. Don’t stop and count,
just count as you knit every few rows, or use a stitch counter and
be very diligent about it. Keep counting as you knit and you will
quickly notice a dropped stitch or two stitches where there should
be one. Knitting with furry, loopy yarns can be a counting problem
if you can’t see the stitches. Scarves are the hottest thing for
knitters at the moment, and the lumpier and hairier the yarn, the
better. Because the yarn construction hides the shape of the
stitches, scarves turn to triangles as stitches are dropped and
disappear in the yarn. If extra stitches are picked up in the wrong
spot, the knitting will grow wider than it should be. The easiest
step you can take to help you count the number of stitches is to use
light coloured needles if you are using a dark yarn and dark
coloured needles when using a pale yarn [pic 1].
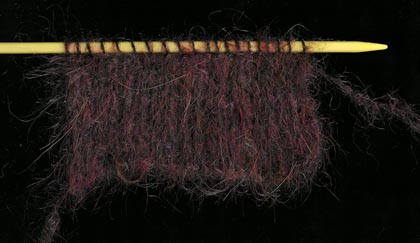
1: This yarn is dark and shaggy and can barely be seen
for counting, but you can easily see how many stitches you have
because the needles are a contrast colour.
If you do detect a dropped or extra stitch
quickly, you will have less rows to undo (see
here). If you can’t
see the mistake, hold the knitting against the light and you should
be able to spot it. Don’t pull at the work, because a dropped stitch
could turn into a ladder. Another way that often works is to look at
the knitting in a mirror. Don’t know why it works, it just does for
me.
NEXT
PAGE >> chapter
page: 1 | 2 |